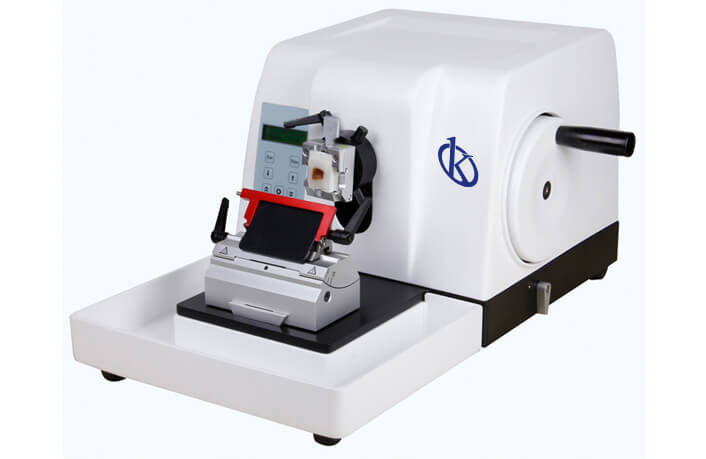
Installation and Commissioning Guide for the YR417-1 Semi-Automatic Rotary Microtome
The YR417-1 semi-automatic rotary microtome is a state-of-the-art device designed for precision slicing in histology and pathological anatomy. This guide aims to provide a comprehensive overview of the installation and commissioning of the YR417-1, ensuring that you can utilize its full potential right from the start.
Unboxing and Initial Setup
Upon receiving your YR417-1 microtome, the first step is to unbox the equipment carefully. Check for any visible signs of damage or missing components. The following items should be included in the package:
- YR417-1 Microtome Unit
- Power Cable
- Instruction Manual
- Calibration Tools
- Spare Blades
Make sure to keep the packing materials in case you need to return the unit. Once unpacked, prepare the workspace by ensuring it is clean, dry, and free of vibrations. Place the microtome on a stable countertop, ensuring there is adequate space around it for operation.
Anchoring and Leveling the Microtome
For optimal performance, the YR417-1 must be anchored and leveled properly. Use the leveling feet to adjust the height and ensure the microtome is perfectly horizontal. You can verify this using a bubble level. An unlevel microtome can result in inconsistent slices, affecting your results.
Power-Up Sequence
Once the microtome is leveled, connect the power cable to a compatible electrical outlet. It is crucial to check the voltage specifications before connecting the unit to avoid any electrical damage. Power on the device using the main switch located at the back of the unit. The display should light up, indicating that the microtome is operational.
First-Run Calibration
Calibration is essential for accuracy. Follow these steps:
- Select the calibration option from the main menu.
- Use the provided calibration tools to ensure the blade is positioned correctly.
- Run a test slice using a standard sample.
- Adjust settings based on slice quality and measurement results.
Regular calibration checks are recommended to maintain precision.
Common Setup Mistakes to Avoid
During installation and commissioning, operators often make a few common mistakes:
- Incorrect Power Supply: Always check voltage compatibility before powering up.
- Poor Leveling: Ensure the unit is perfectly leveled to avoid inaccurate slicing.
- Improper Blade Installation: Follow the manual for correct blade orientation and placement.
Technical Specifications of YR417-1
| Model | Brand | Category | Subcategory | Price (USD) | Weight | Dimensions | Package Size |
|---|---|---|---|---|---|---|---|
| YR417-1 | Kalstein | Pathological Anatomy | Microtome Series | $5200.00 | 42 kg | x x | 65 x 57 x 63 cm |
Frequently Asked Questions
What are the key features of the YR417-1 microtome?
The YR417-1 microtome features semi-automatic operation, precision slicing capabilities, easy blade replacement, and adjustable thickness settings, making it suitable for various applications in histology.
How do I maintain the YR417-1 for optimal performance?
Regular maintenance includes cleaning the microtome, replacing blades as needed, and performing calibration checks to ensure slicing accuracy. Refer to the manual for detailed maintenance procedures.
What types of samples can I use with the YR417-1?
The YR417-1 is designed to handle a range of biological samples, including tissues embedded in paraffin, making it ideal for histological studies.
Is there a warranty on the YR417-1 microtome?
Yes, the YR417-1 comes with a warranty covering manufacturing defects. The details can be found in the warranty section of the user manual.
Can I upgrade the YR417-1 with additional accessories?
Yes, the YR417-1 supports various optional accessories that can enhance its functionality, including advanced blade holders and software upgrades.
What are the environmental requirements for operating the YR417-1?
The YR417-1 should be operated in a stable environment with controlled temperature and humidity levels to ensure consistent performance.
How to troubleshoot if the microtome does not power on?
First, check the power connection and ensure the outlet is functional. Next, inspect the fuse and internal connections. If the issue persists, contact technical support.
If you are looking for a fusion of innovation and quality, you have come to the right place. At Kalstein, we offer you the luxury of exploring our exclusive catalog of laboratory equipment. We manufacture every device to the highest standards of excellence. Our intuitive and seamless online purchasing channels are designed for your convenience, securing the most competitive prices. Hesitate no longer – we bring science to life, it is time to become part of our community.