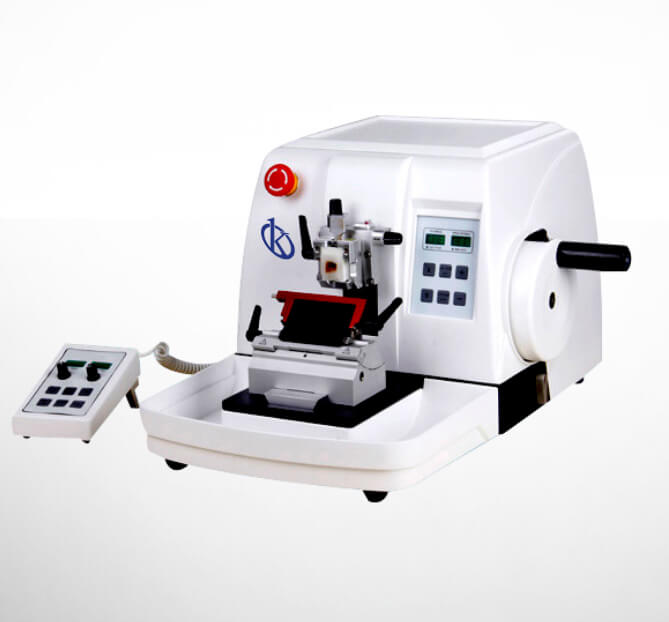
Installation and Setup Guide for the YR415-1 Automated Microtome
The YR415-1 Automated Microtome is a cutting-edge device designed for precise sectioning in pathological anatomy. This guide will detail the necessary steps for installation and initial setup, ensuring optimal performance and reliability once operational.
Unboxing Checklist
Before proceeding with installation, it's crucial to conduct an unboxing checklist to ensure that all components are present and undamaged. The following items should be included:
- YR415-1 Automated Microtome unit
- Power supply and cable
- Sample clamps (two types: paraffin locking clamp and cassette clamp)
- Operational manual
- Safety guards
- Waste tray
- Replacement blades
- Calibration tool
- Installation tools (if needed)
Site Requirements and Environmental Conditions
Before installation, ensure that the site meets the required environmental conditions:
| Requirement | Specification |
|---|---|
| Temperature Range | 15°C to 30°C |
| Humidity | 30% to 70% (non-condensing) |
| Voltage and Frequency | AC 220V±10% 50Hz or AC 110V±10% 60Hz |
| Ventilation | Well-ventilated area required |
| Space Clearance | Minimum 15 cm around the unit |
Physical Installation Steps
Follow these steps to physically install the YR415-1:
- Positioning: Place the YR415-1 on a stable, flat surface away from direct sunlight and drafts.
- Anchoring: Ensure the unit is secured to prevent any movement during operation.
- Leveling: Use a spirit level to ensure the microtome is level before proceeding.
Power-Up Sequence
To safely power up the YR415-1:
- Connect the power supply to the unit and the electrical outlet.
- Switch on the main power button found on the side of the device.
- Check the digital display for any error messages or alerts.
First-Run Calibration
Calibration is crucial for the YR415-1 to ensure accurate slicing. Follow these steps:
- Install the blade securely in the blade holder.
- Set the thickness to the desired setting using the digital display.
- Perform a test slice with a calibration sample, ensuring the thickness is consistent.
- Adjust the settings if necessary based on the results of the test slice.
Common Setup Mistakes
Be aware of these common mistakes during setup:
- Failing to level the unit, which can affect slicing accuracy.
- Neglecting to check electrical connections, leading to power issues.
- Improper blade installation, risking damage to the microtome and inaccurate slices.
- Ignoring environmental conditions, which can affect the microtome’s performance.
Technical Specifications of YR415-1
| Specification | Detail |
|---|---|
| Model | YR415-1 |
| Type | Rotary |
| Usage Mode | Automatic |
| Max Sample Size | 70 x 70 mm |
| Min Cutting Thickness Setting | 0.25 µm |
| Horizontal Feed | 28 mm |
| Vertical Sample Stroke | 70 mm |
| Sample Holder Rotation | Any angle within 360 degrees |
| Blade Base Movement Range | 0-60 mm (forwards and backwards) |
| Pressing Plate Blade Movement Range | 0-23 mm |
| Sample Clamp Rotation | Any angle within 360 degrees |
| Sample Orientation | XY-8° |
| Speed Adjustment Range | 1500 µm/s to 3500 µm/s |
| Accuracy Error | ±1% |
| Working Voltage | AC 220V±10% 50Hz / AC 110V±10% 60Hz |
| Power | 150W |
| Dimensions | 580 x 475 x 340 mm (Width x Depth x Height) |
| Net Weight | 41 kg |
Frequently Asked Questions
What are the key features of the YR415-1 Automated Microtome?
The YR415-1 Automated Microtome features an aerodynamic design, advanced feeding system, adjustable automatic slicing speed, and a user-friendly interface, making it ideal for consistent and reliable sample sectioning.
How do I perform maintenance on the YR415-1?
Regular maintenance includes cleaning the blade holder, checking electrical connections, ensuring the waste tray is emptied, and calibrating the unit periodically to maintain slicing accuracy.
What safety features does the YR415-1 have?
The YR415-1 includes safety braking systems, emergency alarms, overload protection for the driver, and automatic sleep protection, ensuring user safety during operation.
Can the YR415-1 be used for different sample materials?
Yes, the YR415-1 can accommodate various sample materials, making it versatile in applications ranging from histology to industrial sample preparation.
What are the dimensions and weight specifications of the YR415-1?
The device measures 580 x 475 x 340 mm and has a net weight of 41 kg, requiring a stable surface for installation.
How do I troubleshoot common issues with the YR415-1?
Common troubleshooting steps include checking power connections, ensuring the blade is properly installed, and calibrating the settings after cleaning, to resolve issues like inconsistent slicing or power failure.
Is training available for operating the YR415-1?
Yes, operator training is recommended to ensure effective usage and maintenance of the YR415-1, which can typically be arranged through the manufacturer or authorized dealers.
If you are looking for a fusion of innovation and quality, you have come to the right place. At Kalstein, we offer you the luxury of exploring our exclusive catalog of laboratory equipment. We manufacture every device to the highest standards of excellence. Our intuitive and seamless online purchasing channels are designed for your convenience, securing the most competitive prices. Hesitate no longer — we bring science to life, it is time to become part of our community.