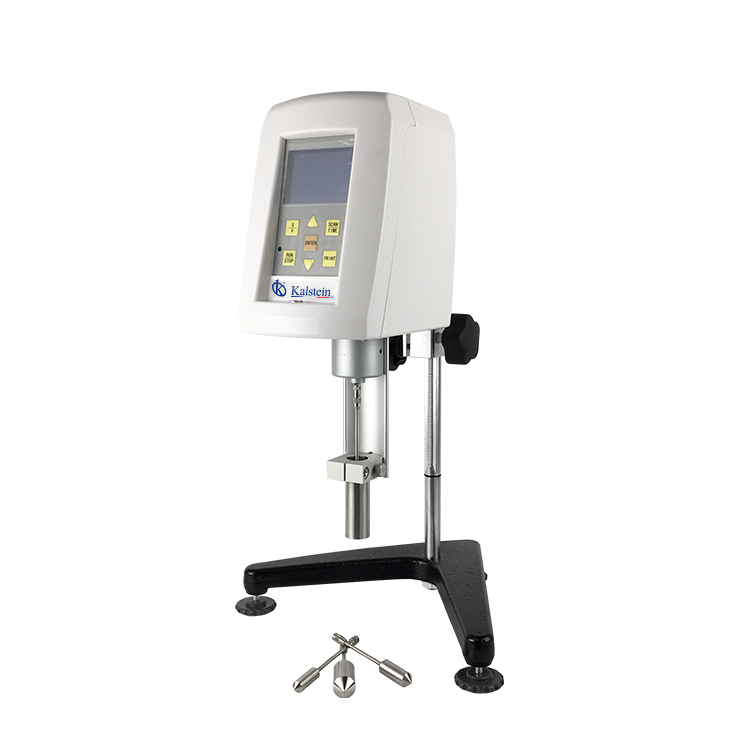
Installation and Startup Guide for the YR05865 Viscometer
The YR05865 Viscometer is a sophisticated instrument designed for precise viscosity measurement of small samples. Ensuring proper installation and startup is crucial for optimal performance and accurate results. This guide will walk you through the entire process, from unboxing to first measurement, covering all essential steps and considerations.
Unboxing Checklist
Before beginning the installation, verify that all components are included in the package. Use the following checklist to ensure nothing is missing:
- YR05865 Viscometer Unit
- Temperature Probe
- Spindles: 0, 1, 2, 3, 4
- Base Plate
- Mounting Frame
- User Manual (in English)
Installation Steps
Proper installation of the YR05865 Viscometer involves several key steps detailed below:
1. Choose the Location
Select a stable, vibration-free surface in a controlled environment. Ensure the area is free from direct sunlight and consistent temperature conditions.
2. Level the Viscometer
Utilize a bubble level to ensure the viscometer is perfectly horizontal. Leveling is critical for accurate viscosity measurements.
3. Secure the Base
Use screws (not included) to securely attach the base plate to the chosen surface. This will prevent movement during operation.
4. Connect the Temperature Probe
Attach the temperature probe to the designated port on the viscometer. Ensure it is fitted properly to avoid measurement errors.
5. Install Spindles
Choose the appropriate spindle based on the expected viscosity of the sample. Attach it to the viscometer according to the user manual instructions.
Powering Up the YR05865 Viscometer
Follow these steps to power up the YR05865 and prepare it for calibration:
1. Plug in the Power Cord
Connect the power cord to the rear of the unit and plug it into a suitable power outlet. Ensure the voltage matches the requirements specified in the technical documentation.
2. Turn on the Unit
Press the power button located on the front panel. The colorful 5-inch touchscreen will light up, indicating that the unit is operational.
3. Initial Calibration
Before taking any measurements, perform an initial calibration. Follow the on-screen prompts to input necessary parameters and calibrate the instrument.
First-Run Validation
After calibration, it is essential to validate the first measurement:
1. Prepare a Calibration Fluid
Use a fluid with a known viscosity to verify the accuracy of the YR05865. This could be a standard calibration fluid provided with the instrument.
2. Conduct a Measurement
Run a viscosity measurement and compare the results with the known viscosity value. Adjust settings if necessary based on initial readings.
Common Setup Mistakes to Avoid
Here are some common mistakes to watch out for during setup:
- Failing to level the viscometer properly, leading to inaccurate measurements.
- Not selecting the correct spindle for the viscosity range of the sample.
- Neglecting to perform calibration using a standard fluid before taking actual measurements.
- Overlooking the need for a stable environment free from vibrations and direct sunlight.
Technical Specifications of YR05865
| Model | YR05864 | YR05865 (current) |
|---|---|---|
| Measurement Range | 1-100,000 Cps/Mpa.s | 1-2,000,000 Cps/Mpa.s |
| Spindles | 0, 1, 2, 3, 4 | |
| Rotation Speed | 6 / 12 / 30 / 60 rpm/min. | 0.3 / 0.6 / 1.5 / 3 / 6 / 12 / 30 / 60 rpm/min. |
| Measurement Precision | ±2% | |
| Measurement Repeatability | ±1% | |
| Kinematic Viscosity | Yes (mm2/s) | |
| Liquid Density | Yes (g/cm3) | |
| Torque | Yes | |
| Shear Rate | Yes | |
| Additional Information | 6,12,30,60 rpm/min | 0.1,0.3,0.6,1.5,3,6,12,30,60 rpm/min |
| Mpa.S | 1-1X10⁵ | 1-2X10⁶ |
Frequently Asked Questions
What is the optimal temperature range for operating the YR05865 Viscometer?
The YR05865 operates best in a temperature range between 15°C and 25°C. Maintaining this range is critical for accurate viscosity measurements.
How often should I calibrate the YR05865 Viscometer?
Calibration should be performed before the first use and regularly thereafter, ideally every month or after any significant movement of the device.
What types of samples can be measured with the YR05865?
The YR05865 is designed to measure Newtonian and non-Newtonian liquids, making it suitable for various applications in laboratories.
What should I do if the YR05865 displays an error code?
Refer to the user manual for troubleshooting steps specific to the error code displayed. Common solutions include checking the spindle installation and ensuring the device is calibrated.
Can the YR05865 be connected to a computer for data logging?
Yes, the YR05865 has options for USB connectivity, allowing you to log data to a computer for further analysis.
What is the warranty period for the YR05865 Viscometer?
The YR05865 comes with a one-year warranty that covers manufacturing defects and malfunctions under normal use conditions.
How can I obtain spare parts for the YR05865?
Spare parts can be ordered directly through authorized distributors or requested via the manufacturer’s customer support.
If you are looking for a fusion of innovation and quality, you have come to the right place. At Kalstein, we offer you the luxury of exploring our exclusive catalog of laboratory equipment. We manufacture every device to the highest standards of excellence. Our intuitive and seamless online purchasing channels are designed for your convenience, securing the most competitive prices. Hesitate no longer — we bring science to life, it is time to become part of our community.